Audio Compression Explained: How to Use a Compressor for a Professional Mix
Audio Compression is one of the key processes used in music production. Pretty much every professionally recorded track you have ever heard will have compression all over it.
And yet this is a process that is often poorly understood by novice producers – often because they think it’s more complicated than it actually is.
In this article, we take a deep dive into all things compression-related, examining everything from the fundamentals to some incredibly useful advanced techniques.
What is Audio Compression (Dynamic Range Compression)?
When we discuss compression in music, we are talking about dynamic range compression. Essentially, this all boils down to shrinking the gap between the loudest and quietest parts of an audio signal.
In even more simple terms – a compressor is basically an automatic volume control; when the signal gets too loud, the compressor turns it down. This has the effect of making an audio signal more consistent in volume, which can make it sound smoother and allow it to sit in the mix at a level that is audible at all times.
If you are new to music production, compression can seem daunting - and we’ve done our best to demystify this subject in the past. But remember that when you really break it down in simple terms, a compressor is just an automatic way of turning the volume down on something.
Why Use Compression in Your Music?
The use of compression is often very subtle, but let’s take an extreme example in order to explain the concept clearly. Imagine a heavy metal vocal in which the verses are whispered while the choruses are screamed.
Without compression, the verses will be too quiet to hear, even when the choruses are painfully loud! Compression solves this problem; the level of the screamed vocals is lowered so that they are the same volume as the whispered vocals, and then the entire signal is turned up to a level at which it is consistently audible.
It is very common when producing music to compress many or even all of the tracks in your mix individually, although you will perhaps only occasionally compress to the extreme levels described above. Some light compression on a musical element just helps it to sit at a consistent level throughout your track. Imagine a bass player who hits the occasional string a little too hard; compression will smooth out their performance.
Compression is often used on the master bus too. If using a compressor on individual tracks allows you to level out volume discrepancies of individual instruments, a compressor on the master bus performs the same function at a full track level.
This means that you can avoid sudden, surprising shifts in volume level – between a verse and a chorus for example. In the last few decades, master bus compression has increasingly been used to ensure that tracks are at a very high level of loudness from start to finish – a process often described as the loudness wars. If you want to know more, we’ve discussed this subject in much more detail in our article, ‘A Brief History of Mastering’.
Once you have mastered the basic functionality of the compressor, there are plenty more ways to utilize this versatile tool in your mix; side-chain compression, multi-band compression, and parallel compression are techniques that are frequently used in a wide range of genres. We explain each of these processes in detail, But first, let’s explore the control panel of a compressor step by step.
The Compressor Knobs Every Music Producer Should Know About
Hopefully, by now, the purpose of compression is clear – but what about the practicalities? What do the individual controls on a compressor do, and how do you set them to achieve the sound you are looking for? Let’s take a look at each of the knobs you will find on a compressor in turn in order to answer these questions.
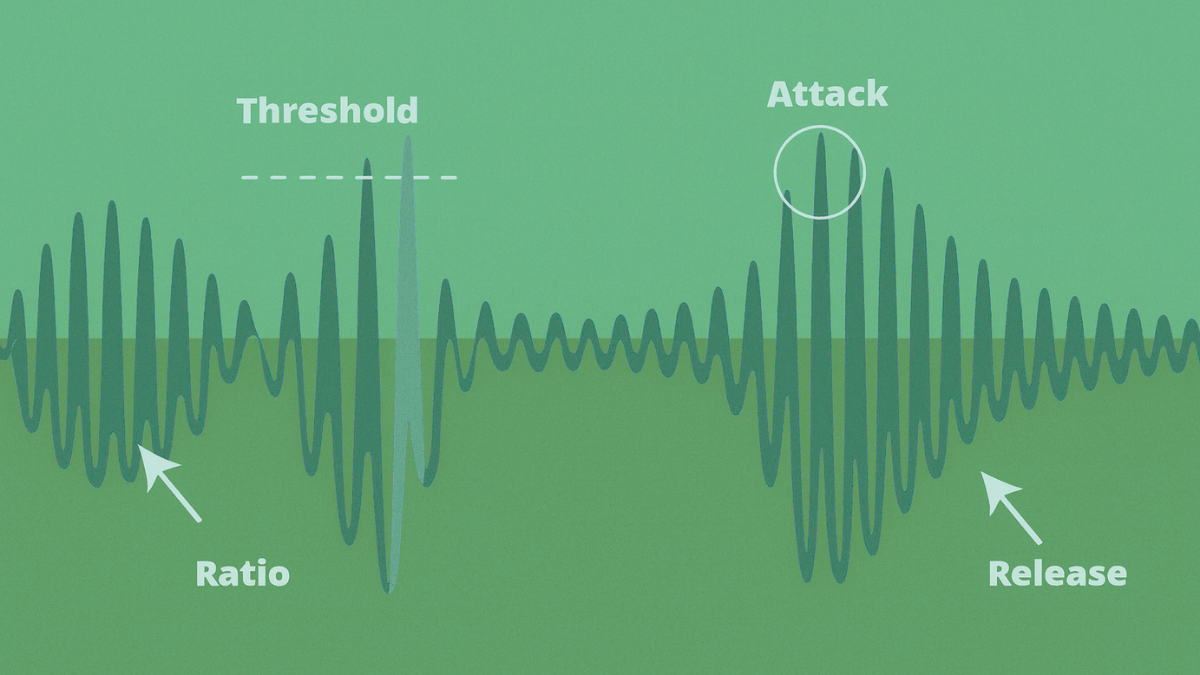
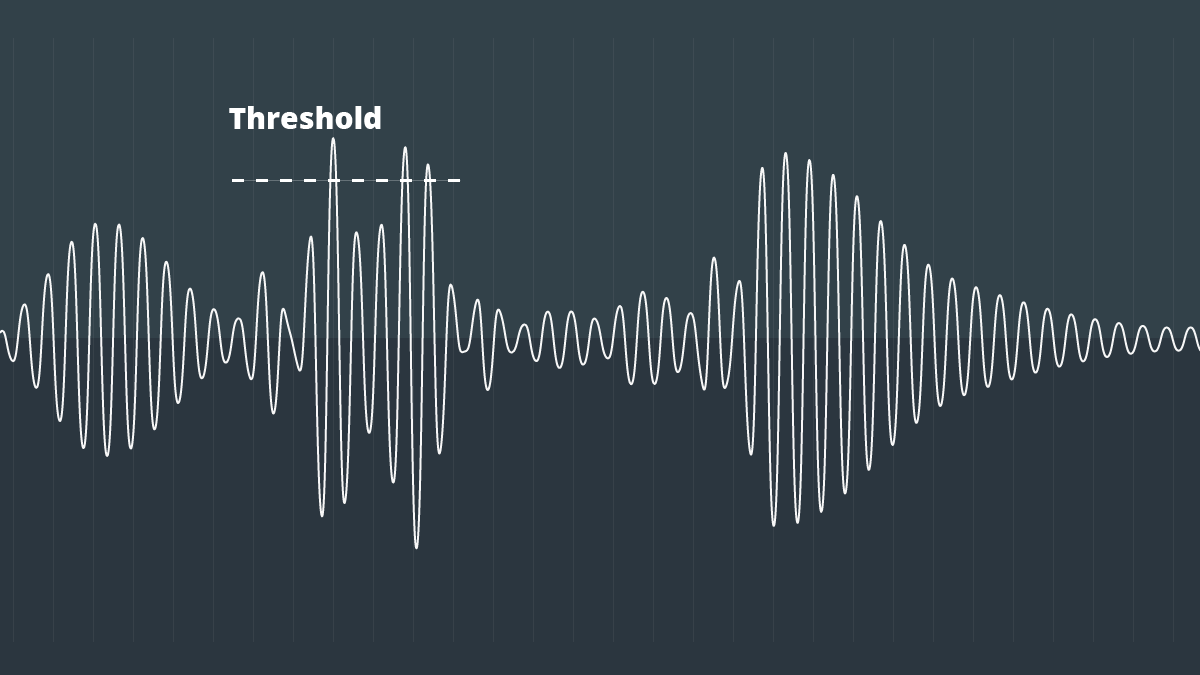
Threshold
This is the point at which your compressor starts compressing. If a signal stays below the threshold, then the compressor won’t touch it – but as soon as it goes over the threshold, the compression will begin. So if your threshold is set at -10dB, then the signal will remain uncompressed as long as it is quieter than -10dB.
Once the signal gets louder than the threshold, the compressor kicks in. Once we’ve settled on a threshold level, we need to figure out how we want to compress our signal – how hard or how soft, how fast or how slow. This is all is determined by how we set the other controls.
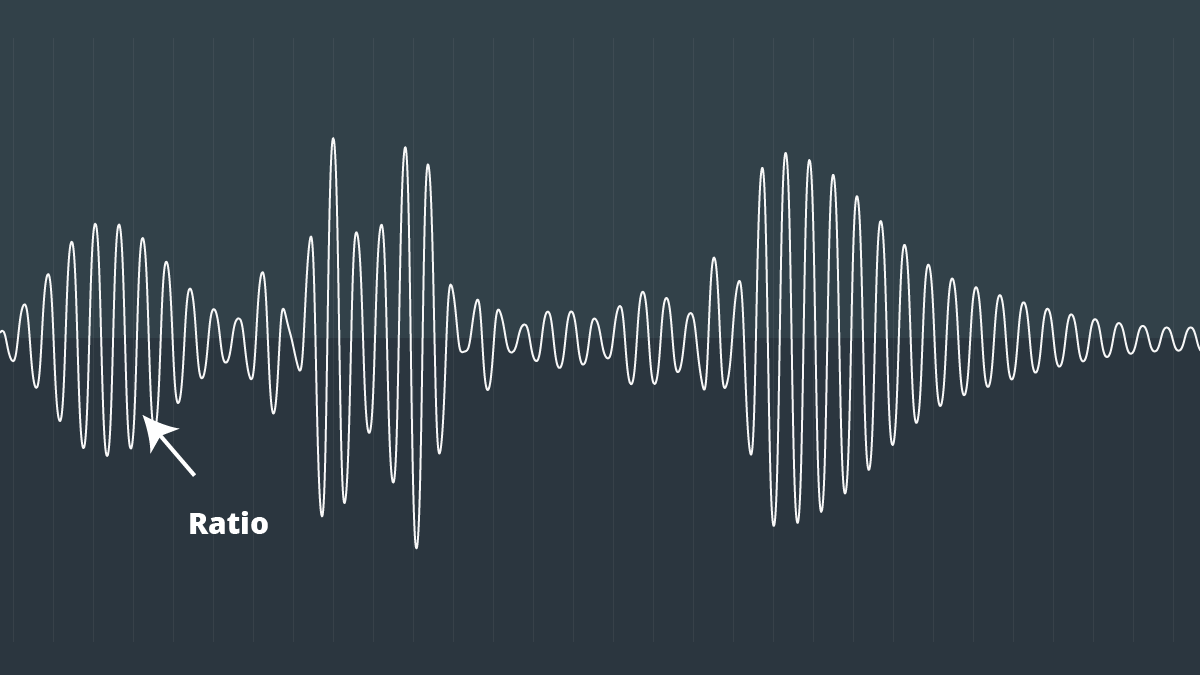
Ratio
The threshold determines when the compressor starts working, and the ratio determines how much compression is applied. A ratio of 2:1 means that for every 2dB your signal would have gone over your threshold, it will now only go over that threshold by 1dB. So if your compressor has a ratio of 2:1 and the uncompressed signal goes 8dB above the threshold, then your compressed signal will only go 4dB above the threshold.
A ratio of 4:1 means that for every 4dB your uncompressed signal would have gone above the threshold, it will now only go over that threshold by 1dB – and so on. The ratio can go all the way up to ∞:1 – at this point it becomes a ‘limiter’; it won’t let the signal get any louder than the threshold you set.
Attack
The attack control specifies how quickly the compressor reacts in reducing gain; how quickly it kicks in after the signal goes over the threshold you have set. To explain this let’s consider how changing the attack time might alter the sound of a snare drum that’s going through our compressor. If you set a very fast attack time, then as soon as the snare is hit, the compressor will kick in. This means that the loud transient at the start of the snare sound will be compressed, which has the effect of softening the drum sound.
If we set the attack a little slower, then we can allow the transient to sneak through before the compression kicks in. This means that you will retain the sharp impact of the drum hit, but the tail of the snare will be compressed. The attack therefore helps us to shape the character of a sound, and it does this in tandem with the release control.

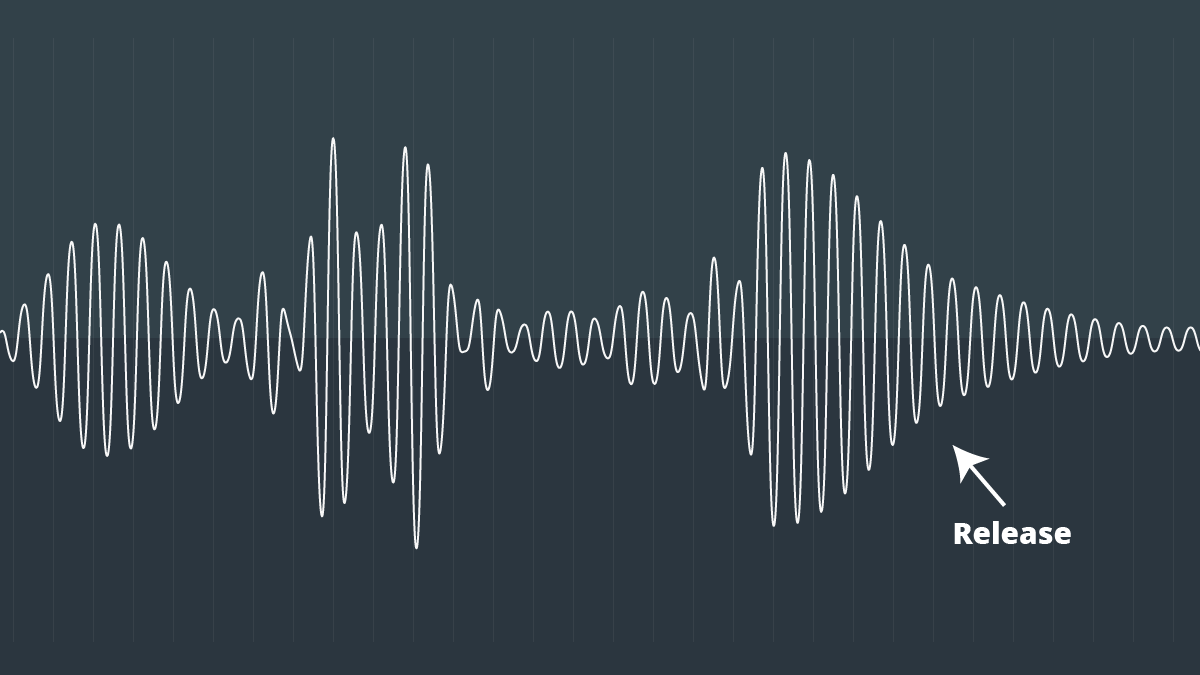
Release
If the attack governs when the compressor kicks in, the release dictates the point at which the compressor should stop compressing. When the input signal dips below the threshold, the compressor won’t stop working immediately – it will continue to operate for the period of release time that you have set.
Let’s consider our snare drum again, and think about how different release times could affect the sound. Remember that when we set a fast attack, the strength of the snare transient is reduced. If we combine this with a fast release time, the tail of the snare will remain relatively uncompressed. This means that the snare tail will sound more prominent in comparison with the attack of the sound.
If we combine a fast attack with a slow release then the entire snare drum sound will be compressed, meaning that the character of the sound won’t change all that much – it will probably just sound a bit smoother.
Finally, if we use a slow attack alongside a slow release, we will have a strong attack transient and a quieter tail. This will make the drum sound more ‘staccato’ in nature (the sound will be shorter and sharper).
Gain
The gain control on a compressor is often called ‘makeup gain’, and this is because it is used to bring the signal back up to a useable level. Remember that compressors work by making the louder parts of a signal quieter?
Well that means that once compression has taken place, your signal will be too quiet in the mix. Makeup gain simply boosts the level of the entire compressed signal up to the level that you want it in your mix.
And One More Control It Might Help To Understand… Knee
This isn’t a control that you will find on all compressors and it, therefore, is not as essential to understand as the others. However, it is not an uncommon feature – and perhaps you are wondering what it does!
A ‘hard knee’ means that a signal will be reduced sharply when the threshold is exceeded. A ‘soft knee’ means that the compression is introduced more gradually. On many compressors, you can change the shape of the knee gradually from hard to soft so that you can decide on the character your compression has.
The thing to remember is that if you compress with a hard knee, the sound of the compression is more obvious; compressing with soft knee makes the compression more transparent. The character you choose may well depend on the genre of music you are mixing; for hard rock or EDM a harder knee might sound good, for folk or jazz a softer knee is probably more appropriate. However, as always, use your ears and settle on a setting that sounds good!
Advanced Audio Compression Techniques
OK, so you’ve mastered the basics – what’s next? There is still plenty more to learn as compressors really are very versatile little tools. Below, we’ll guide you through a few advanced compression techniques that could really help to elevate your mixes.
Sidechain Compression
Sidechain compression (often called ‘sidechaining’) is an incredibly useful technique, and one that is a staple of pretty much every EDM production out there. However, it can be used effectively across a huge range of genres – both to solve mix problems and as a creative tool.
So what is sidechaining? Let’s imagine we are compressing a guitar. If we were to compress it in the usual way, then the guitar signal would control the level of compression on the guitar. This probably seems obvious – when the guitar gets too loud, the signal exceeds the compressor’s threshold and those notes that were too loud – they get turned down.
But what if we were to use another signal to trigger the compressor - like a kick drum for example? Now, every time the kick drum exceeds the threshold, the guitar gets turned down. This is side-chain compression. Why would you want to do this? Well, there are actually a huge number of practical reasons that this is useful.
Sidechaining elements to the kick drum is extremely standard practice in EDM – often every single other musical element will be going through a compressor that is being triggered by the kick drum. This is partly a stylistic device but it also has a very important practical application – if everything else is quieter when the kick hits, it allows the kick to be that much louder. In a genre based around heavy kick drum sounds that will sound huge when coming through club sound systems, this is incredibly useful.
There are lessons here for other genres too – in many rock music genres it is common for the kick to mask the bass guitar and vice versa. These musical elements sit in similar areas of the frequency spectrum, and if you are not careful they end up fighting for the same space. This can lead to the bottom end of your track becoming muddy. You can fix this with EQing, but sidechaining can also help. Sidechain your bass guitar to your kick and it will duck slightly out of the way every time the kick drum hits, creating space in the bottom end of your mix.
There are plenty of other applications for sidechain compression too; you can under-mic your drums and use those signals to trigger noise gates. You can use your kick drum to trigger notes on a sub-bass synth. In reality there is nothing to stop you getting creating and sidechaining anything to anything else! For example on Prince’s smash hit, ‘Kiss’, producer David Z sidechained the acoustic guitar to the hi-hat and created the distinctive and memorable musical centrepiece of the song. We go into all these techniques in more depth on our blog.
Multi-Band Compression
‘Regular’ compression can also be known as ‘broadband’ compression; it will attenuate the entire input signal, right across the frequency spectrum. Multi-band compression is different; it splits the input signal into different frequency bands and can compress each of these bands individually – meaning that you can set the compressor differently for each frequency band.
One very common example of this kind of compression is the de-esser. These are used to turn down harsh ‘ess’ sounds on vocals. Using a de-esser, we can compress only the frequency band where sibilant ess sounds are heard – somewhere between 3-8kHz in most cases. The result is that the esses get quieter, while the rest of the vocal remains relatively untouched.
Another common use of this kind of compression is as part of the effects chain on a master channel. The fine control provided by multiband compression means that you can really dig into the detail of a track and manipulate different frequencies in different ways – for instance, you can use this tool to tighten up the low end of a track.
There are plenty of other uses for multiband compression too. You can use it to counter the ‘proximity effect’ on a vocal. All directional microphones boost the low frequencies of sound sources that are close to them. If your singer is moving backwards and forwards while singing, then their vocal will sound bassier when they are closer to the mic. This can be fixed by compressing the low end of their vocal.
In some rooms, there might be particular resonances that are triggered by certain notes, meaning that those notes sound much more prominent than the others. Once again this can be fixed by zeroing in on the problematic frequencies and using multiband compression to attenuate them.
Parallel Compression
Sometimes known as ‘New York’ compression after the city in which its use was popularised, parallel compression is quite a simple technique, but one that can be incredibly useful. The basic idea is that you split your signal in two, compressing one half quite heavily, while leaving the other half untreated. In theory, this gives you the best of both worlds; the solid consistency of a compressed signal, blended with the dynamic performance of the original signal.
Achieving parallel compression couldn’t be easier with some compressors; if your compressor has a ‘wet/dry’ control you can use this to mix the compressed and uncompressed signals with the touch of a dial. Even if your compressor doesn’t have this feature, it won’t take you much longer to set parallel compression up. You can duplicate the track in your DAW and compress the duplicate while leaving the original uncompressed. Alternatively, you can send a track to a bus to which you then add a compressor.
Because the transients are unaffected by compression on the original track, this technique works really well on drums. The drums keep their snap, but are fattened up by the compressed track. Parallel compression also works well on vocals if you want to retain a dynamic performance while just adding a little more consistency.
How to Hear Compression
The sound of compression can be very obvious, but it can also be extremely subtle and it’s therefore important to understand what you are listening out for when adjusting your compressors. SoundGym has a range of Compression Games that are designed with exactly this purpose in mind; training your ears to hear the difference that compression makes to a sound.
So, what should you be listening out for when trying to decipher what difference a compressor is making to an audio signal?
Firstly try and figure out if the dynamic range is getting smaller. This can be tricky, but is more obvious on sounds like a snare; if it sounds more consistent, then a compressor is affecting the signal. There are other giveaways in the drum sound too – listen out for whether the tails are getting longer, and for if the attack transients are losing their ‘snap’.
As we’ve already seen, if a compressor has a fast attack time it will squeeze the transients and make the drum sound appear softer, and if the attack of a drum becomes quieter compared to the tail then the tail will seem louder by comparison – and will therefore seem to be ringing out longer.
You may also want to listen to the ‘ambience’ of the material. This could mean things like room sound, reverb, hi-hat sizzle etc.; the things that you hear in between the main impacts.
If the ambience seems to be getting louder and you are getting an increased level of detail in the quieter parts of a track, then that is another dead giveaway that you are hearing the sound of a compressor in action. For more detail on how to hear compression, along with another tip or two, check out our article ‘How to Hear Compression: 5 Hints You Should Listen To’.
Is There More To Learn?
Hopefully, now you have a grasp on the basics of compression, you know what to look out for when listening to a compressed signal, and perhaps you’ve even experimented with some advanced compression techniques. This is more than enough to get you on your way – but if you are interested, there is always more to learn.
Dig around on our blog, and you will find articles on incorporating serial compression and post-reverb compression into your mixes and even more techniques for improving your mix with multi-band compression. And of course, don’t forget to train yourself up with our compression games – Compressionist and Dr. Compressor. Very soon you will be right at home using this wonderful tool in a multitude of ways across your mixes!


Comments:
Oct 10
Oct 09
Login to comment on this post